City Tour: A Designer's Guide to Mastering the World's Most Scenic Display Font
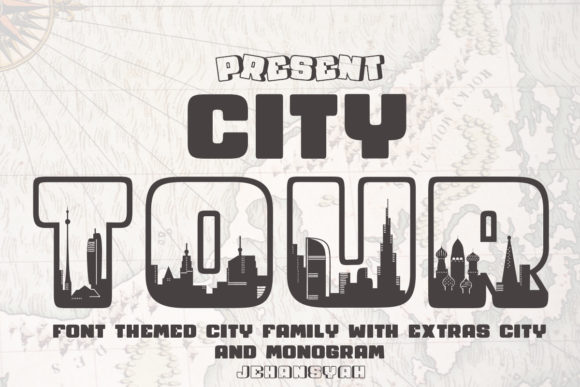
Imagine capturing the electric energy of a New York skyline, the romantic allure of Paris, or the neon glow of Tokyo in a single typeface. This is the promise of City Tour, an incredibly detailed display font that goes beyond simple letters to offer beautiful landscapes of famous cities. For graphic designers, marketers, and creators looking to make an instant impact, City Tour offers a visual vocabulary that standard fonts simply cannot match. However, while the "wow" factor is immediate, using such a complex font effectively requires a strategic approach to avoid common pitfalls that can clutter your message.
Understanding the Visual Power of City Tour
City Tour is not just a font; it is a collection of miniature artworks. It features intricate silhouettes of skylines embedded within the letterforms, accompanied by stylistic variations that include bold graffiti, clean outlines, and whimsical cloud fonts. This variety makes it an attractive choice for travel blogs, event posters, and branding projects that need a sense of place. The allure is understandable—who wouldn't want to use typography that doubles as illustration?
However, the very detail that makes City Tour stunning is also what makes it dangerous for the uninitiated designer. The line between "visually rich" and "visually chaotic" is thin. To use this font successfully, one must look past the initial excitement and evaluate the technical and aesthetic requirements of the project at hand.
The "Wall of Text" Trap: Why Readability Matters
The most frequent error beginners make with display fonts like City Tour is prioritizing style over substance. Because the font features intricate cityscapes and textures, it demands significant visual processing power from the viewer. When you use City Tour for body text, long paragraphs, or small font sizes, the result is not artistic—it is illegible.
The Consequence: If your audience struggles to read your message, they will simply stop trying. This leads to higher bounce rates on websites and lower engagement on print materials. A beautiful design that fails to communicate is ultimately a failed design.
The Better Approach: Treat City Tour as the headline act, not the background singer. Use it strictly for Hero titles, logos, or short, punchy statements where the text size is large enough to showcase the architectural details without blurring together. For body text, pair City Tour with a clean, sans-serif font like Arial or Helvetica. This contrast creates a hierarchy that guides the eye: the headline grabs attention with its intricate design, and the body text delivers the information clearly.
Overlooking the Context: Matching Font Style to Message
City Tour offers various styles, including graffiti and cloud fonts. A common misunderstanding is that these styles are interchangeable. They are not. Each style carries a specific psychological weight and cultural association.
The Mistake: Using the "Graffiti" style for a corporate law firm’s brochure or the "Cloud" font for a gritty, industrial construction company. This mismatch creates cognitive dissonance for the viewer, making the brand feel inauthentic or confused.
Practical Advice: Before selecting a style within the City Tour family, define the personality of your project.
- Cloud Fonts: Best suited for travel agencies, dreamy wedding invitations, or children’s education materials. They evoke lightness, freedom, and imagination.
- Graffiti Styles: Ideal for streetwear brands, music festivals, or urban tourism campaigns. They communicate rebellion, energy, and raw creativity.
- Outline Fonts: These are versatile and work well for overlaying on images. They provide the structural shape of the city without overwhelming the background photo.
The Integration Challenge: Combining Elements Effectively
One of the selling points of City Tour is the ability to combine elements. However, "endless possibilities" can quickly lead to "endless clutter." Beginners often try to stack multiple decorative elements, use every color in the rainbow, and layer the font over busy backgrounds.
The Impact: This results in a noisy design that looks amateurish. The intricate details of the city skylines get lost against complex backgrounds, and the message is buried under decorative noise.
How to Avoid This:
- Embrace Negative Space: Because City Tour is dense, it needs room to breathe. Ensure there is ample whitespace (or negative space) around your text. This isolates the font and allows the viewer to appreciate the architectural details.
- Solid Backgrounds: Avoid placing City Tour over photographs unless you use a solid color overlay or a blur effect behind the text. The font works best against flat, contrasting backgrounds.
- Limit Your Palette: Stick to two or three colors. If you are using a multi-colored City Tour style, let the font be the source of color and keep the rest of the design monochromatic.
Technical Checks Before You Buy or Download
Before committing to City Tour for a professional project, you must evaluate the technical specifications of the font files. Not all display fonts are created equal, and overlooking technical details can cause headaches later in the production process.
What to Check:
- File Formats: Ensure the font comes in OTF (OpenType) or TTF (TrueType) formats for desktop use, and WOFF/WOFF2 for web use. If you are a web designer, verify that the font is web-optimized to ensure fast loading times.
- Kerning and Spacing: Detailed fonts often suffer from poor kerning (the space between specific letter pairs). Type out the full alphabet and common pairs (like "To", "AV", "Ty") to see if the spacing looks even. If the letters crash into each other, you will spend hours manually adjusting spacing.
- License Scope: As a creator or business owner, you must ensure the license covers your specific use case. Does it allow for print-on-demand (POD)? Can you use it in a logo that will be trademarked? Always read the EULA (End User License Agreement) to avoid legal issues down the road.
Realistic Applications: Who is City Tour For?
While City Tour is visually striking, it is a niche tool. It is not a replacement for your primary corporate typeface. It is a specialized asset designed to evoke a specific sense of wanderlust and urban excitement.
Ideal Use Cases:
- Travel Bloggers: Creating header images for articles about specific cities.
- Event Planners: Designing invitations for destination weddings or city-themed parties.
- Small Business Owners: Creating logos for tourism companies, city tour operators, or urban photography studios.
- Social Media Marketers: Designing eye-catching Instagram stories or Pinterest pins that need to stop the scroll.
Final Thoughts on Quality and Satisfaction
Choosing a font like City Tour is about more than just aesthetics; it is about communication. When used correctly, it can elevate a standard design into something memorable and immersive. However, the satisfaction you derive from this font depends entirely on your ability to control it.
Do not let the intricate details overwhelm your audience. Use it sparingly, pair it wisely with simple typefaces, and always prioritize the legibility of your message. By avoiding the common mistakes of overuse and style mismatch, you can harness the full potential of City Tour to create designs that truly make people say, "Wow." Remember, the best design is one where the typography serves the content, not the other way around.