Happy Rabbit: The Ultimate Easter Bunny-Themed Font for Charming Designs
When the spring season arrives, designers and hobbyists alike seek that perfect visual element to capture the playful spirit of Easter. Happy Rabbit has established itself as a premier typeface in this niche, offering a unique blend of whimsy and functionality. It is not merely a collection of letters; it is a specialized tool designed to inject personality into Easter cards, decorations, themed birthday parties, nursery decals, and much more. However, like any specialized design asset, achieving the best results requires more than just a simple download. To truly master this font, one must understand its mechanics and avoid the common pitfalls that can turn a charming design into a cluttered mess.
Understanding the Dual-Character Mechanism
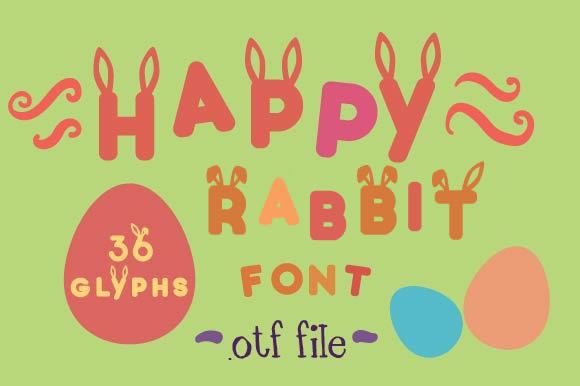
The defining feature of Happy Rabbit is its "bunny ear" motif. But the true utility of this font lies in its intelligent keyboard mapping, a detail many beginners overlook. The font is designed with a specific toggle system built directly into your keyboard's capitalization function.
When you type using lowercase characters, the letters appear adorned with cute, floppy bunny ears. This is the default state most users expect. However, when you switch to capital letters, the font automatically outputs the standard characters without the ears. This allows you to seamlessly alternate between decorated and plain text without switching fonts. A common mistake is attempting to use two separate fonts—one for the ears and one for the plain text—leading to inconsistent kerning and alignment issues. By sticking to the single Happy Rabbit file and simply toggling your Caps Lock or Shift key, you maintain visual consistency across your entire project.
Avoiding the "Gimmick Overload"
One of the most frequent errors in using novelty fonts like Happy Rabbit is the "gimmick overload." Because the font is so cute, there is a temptation to use the bunny-ear version for every single word in a design. This approach usually backfires. If every letter has ears, the text becomes difficult to read, and the visual hierarchy of your design collapses. The ears add visual weight to the text; if everything is heavy, nothing stands out.
The Better Approach: Treat the bunny ears as an accent, not the foundation. Use the lowercase (with ears) version for headlines, names, or single words like "Hop" or "Easter." Then, use the uppercase (without ears) version for subtitles or longer descriptive text. This creates a rhythm in your typography that guides the viewer's eye naturally, ensuring your message is communicated clearly while maintaining the festive theme.
Choosing the Right File Format for Your Project
A significant oversight occurs during the purchasing or downloading phase. Many users assume that a standard font file (.OTF or .TTF) is all they will ever need. While these files are essential for typing directly into word processors or design software like Photoshop and Illustrator, they are not always the best solution for every application.
The creators of Happy Rabbit understand that modern crafting has diverse needs. Therefore, they also offer an SVG, PNG, and DXF version of the font. Ignoring these formats can limit your efficiency, particularly if you are a small business owner or hobbyist using cutting machines.
- Cricut and Silhouette Users: If you are creating decals or iron-on transfers, the SVG and DXF files are crucial. While you can use the standard font, SVG files often retain cleaner paths and specific layering that standard fonts might lose during import.
- Canva and Digital Planners: If you do not have access to advanced desktop software and prefer using browser-based tools like Canva, the PNG version is invaluable. It allows you to drag and drop pre-rendered letters as images, bypassing software compatibility issues entirely.
Before you begin your project, evaluate your end goal. If you are typing a long paragraph for a digital invitation, the standard font is best. If you are cutting vinyl for a nursery wall decal, the vector files are superior. Downloading the complete package ensures you have the right tool for the job.
Legibility and Sizing: Getting the Balance Right
Novelty fonts often have different legibility thresholds than standard serif or sans-serif fonts. A common mistake is sizing Happy Rabbit too small. The intricate details of the bunny ears can become muddy or disappear entirely if the font size is reduced below a certain point, particularly on lower-resolution screens or standard home printers.
Practical Advice: Always perform a "squint test" before finalizing your design. Step back from your screen and squint your eyes. If the text blurs into a blob, the font is too small. For nursery decals or party banners, Happy Rabbit usually shines brightest at larger display sizes—typically 24pt and above. If you need to include smaller text, such as event details or RSVP information, consider pairing Happy Rabbit with a simple, clean sans-serif font. This contrast ensures the "Happy Rabbit" headers pop while the details remain readable.
Color and Contrast Considerations
Because the font features distinct shapes (the ears), color choice plays a massive role in the final presentation. A frequent misstep is using pastel colors for both the text and the background. While pastels are synonymous with Easter, a light pink font on a light yellow background will vanish.
If you are creating a nursery decal, ensure high contrast. For example, use a deep plum or navy Happy Rabbit font on a white wall, or white text on a dark feature wall. If you are printing on paper, remember that ink saturation varies. What looks like a distinct bunny ear on your monitor might bleed together on cheap cardstock. Always print a small test strip on the actual paper you plan to use before printing 100 invitations.
Integrating Happy Rabbit into Professional Workflows
For freelancers and designers, client communication is key. If you pitch Happy Rabbit to a client for a spring campaign, present it as a "display font" rather than a "body font." Clients who are not design-savvy might try to use it for an entire brochure, leading to a negative user experience. Educate them on the best use cases: headers, logos, and call-outs.
Furthermore, check the licensing. While the font is free for personal use in many contexts, commercial use—such as selling the decals you make or using the font in a logo for a business—often requires a specific license. Always verify the terms of use to avoid legal headaches down the road.
Final Thoughts on the Happy Rabbit Experience
The Happy Rabbit font is more than just a seasonal novelty; it is a versatile asset for anyone looking to add a touch of warmth and playfulness to their projects. By understanding the lowercase/capital toggle system, selecting the correct file format for your hardware, and exercising restraint in your design layout, you can avoid the common frustrations associated with decorative typography.
Whether you are a parent creating a magical birthday party, a teacher decorating a classroom, or a small business owner launching a spring sale, this font offers the flexibility you need. Use the ears for emphasis, keep the text legible, and let the charm of the bunny do the rest. With these practical insights, you are well-equipped to make your next project a resounding success.